
Scheduling and Launching a Zoom Meeting
This document assumes that you have already downloaded the Zoom application and have signed in with your Wellesley domain account and password. For instructions please visit our Zoom Installation and Signing In page. Not sure if you have the Zoom application installed? Test Zoom here.
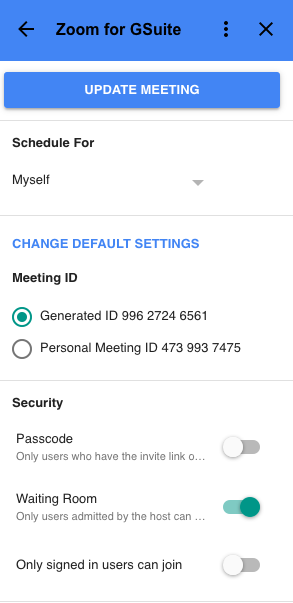
For security purposes it’s required that either the passcode or waiting room be enabled for any Zoom meeting.
Note that every time you schedule a Zoom meeting, the meeting ID will be different. It is important to schedule meetings within Zoom and not copy/paste invitations from previous meetings.
You can schedule a Zoom meeting in your Zoom web portal and copy the meeting information into an email or Google Calendar event.
Create the Meeting
-
Log in to the MyWellesley portal, then click on Zoom at the upper-right.
-
Click on Schedule a Meeting.
-
Enter your meeting settings: Topic, Date, Time, Recurring, etc.
-
Check that either the passcode or waiting room is enabled.
-
Click the blue Save button at the bottom.
-
On the meeting review page, select Copy the Invitation. Note: There’s no notification to let you know the invitation details have been copied to your clipboard.

Now Edit,Paste into an email message that you're going to send to those you wish to invite. For students in your class, you can send it to the Google Group for your course (e.g., ARTS333-01-SP2020).
Or add the meeting link to a calendar event (without using a plugin):
-
Open your Google Calendar. Create a new event or select an existing one.
-
Add a title, then click More options at the bottom
-
Click in the Add Description box, and then paste the Zoom invitation info you copied.
-
Click Add guests, and enter the name of your course Google Group, e.g., GER-202-01-SP12 or other attendees
-
Click the blue Save button at the top, and then Send invitation emails to Google Calendar guests.
We recommend using the Zoom for Google Workspace add-on to schedule Zoom meetings directly in Google Calendar. By using the add-on you are able to schedule a Zoom meeting in the calendar without copying and pasting the Zoom link from the Zoom web portal (see instructions above). See Zoom’s instructions for installing, scheduling, and editing a meeting in your Google Calendar using the add-on.
Scheduling in Google Calendar with Zoom for Google Workspace:
-
After installing Zoom for Google Workspace, open an existing or create a new event in your Google Calendar.
-
Select Add Videoconferencing, then Zoom Meeting.
-
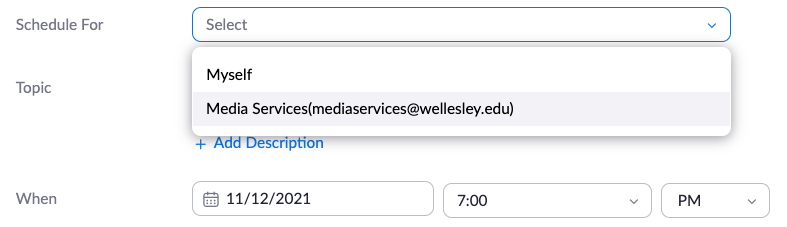
Add guests. Enter a Google Group or individual attendees.
-
When all event details are complete, select Save to send the invitation emails to the Google Calendar guests. The invitation will include the Zoom link.
Review and edit the scheduled Zoom meeting in Google Calendar:
-
Select a calendar event and select the pencil (Edit event) option. When in this view, click on the Zoom button to the far right of your browser window.

-
You’ll see which Zoom settings are enabled. (Waiting room, passcode, etc.) After changing any of these settings, be sure to scroll to the top of the settings window and select Update Meeting. These changes will not affect any other meeting.
-
The same meeting details can be found by accessing your Zoom web portal, selecting the Meetings tab on the far left, and selecting the meeting under the Upcoming tab.
If you’ve been using the Zoom Scheduler plugin and don’t want to use Zoom for Google Workspace, see the Zoom Scheduler instructions. (If you see the option to Make It A Zoom Meeting when scheduling a Google Cal event, you’re using Zoom Scheduler.)
If you want to remove the Zoom Scheduler plugin, see the linked instructions to remove a plugin on your Chrome or Firefox browser.
Zoom allows each account to host one meeting at time. If you are scheduling meetings on behalf of others, we recommend using the scheduling privilege feature to avoid meeting conflicts.
When using "schedule on behalf of," the other person will be assigned as the meeting owner and the meeting will be hosted in their Zoom account. This frees up the scheduler's Zoom account so they don't have to be present during the meeting and can host/attend another meeting.
Both the scheduler and meeting owner can view and edit the meeting.
To allow someone to schedule on their behalf, the meeting owner must first assign scheduling privilege:
-
The meeting owner needs to log into their Zoom web portal (MyWellesley>Zoom or wellesley.zoom.us).
-
Select Settings on the far left.
-
Scroll all the way to the bottom of the meeting settings.
-
Select the + next to "Assign scheduling privilege to."
-
Enter the scheduling person’s full email.
-
Select assign.
Start a Zoom meeting you scheduled, or that was scheduled on your behalf, from the Zoom application or from your Zoom web portal:
- From Zoom application: Your upcoming scheduled meetings are listed on the Home page. Select the blue Start button to begin a meeting. If your meeting is not listed on the Home page, click the Meetings icon at the top, choose Upcoming, select your meeting and then Start.
- From Zoom web portal: Select Meetings at the far left, hover over the meeting title and then select Start.
See Zoom Meeting Fundamentals to review audio/video setup and meeting controls.