
Zoom Meeting Fundamentals (participation, audio/video, screen share, recording, etc.)
Online meetings and classes present a number of unique challenges from managing the participation of remote participants so they do not trip over each other in conversation, to making efforts to maintain the privacy of student interactions.
Hosts and participants should review these fundamentals to make sure their Zoom meeting runs smoothly.
Be clear with participants before the meeting about whether they are expected (or encouraged) to have their video cameras turned on.
Ideally only the current speaker’s microphone is unmuted at a time. If someone’s mic is unmuted and they cough or a dog barks, Zoom will show them in the Speaker View.
Set clear expectations for how participation will be managed. Will you ask participants to use the “raise hand” button before participating? Will questions be posted to the chat first and addressed later? For classroom interaction, suggestions for how to manage specific classroom/remote interactions can be found on our Zoom Remote Teaching Options page.
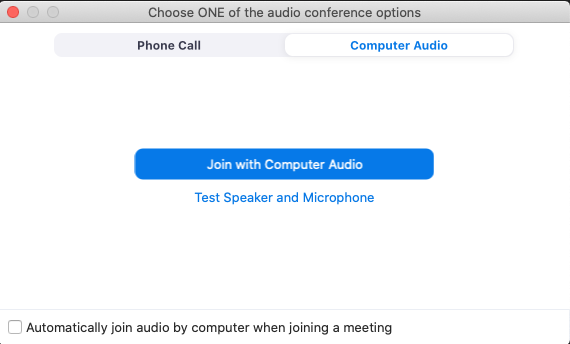
When you first join a Zoom meeting click the blue Join With Computer Audio button.
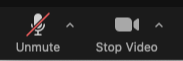
Once your meeting has started, you can mute/unmute your mic and stop/start your camera from the bottom toolbar.

Hearing an echo or feedback?
You can only have one device PER ROOM set up to use a microphone in Zoom. If you prefer to use your phone for audio (by choosing Phone Call when joining the meeting), your computer microphone will not be used. No other computers or phones in the room should be connected to Zoom audio.
Can’t Be Heard?
-
If you see a headphone icon select Join Audio, then select Join with Computer Audio.

-
If you see a line through a mic, your mic is muted. Select Unmute to turn on your mic.
-
If you're not able to unmute the host may have chosen that all participants stay muted.
-
Are your microphone settings set to always active, or push-to-talk?
More troubleshooting tips.
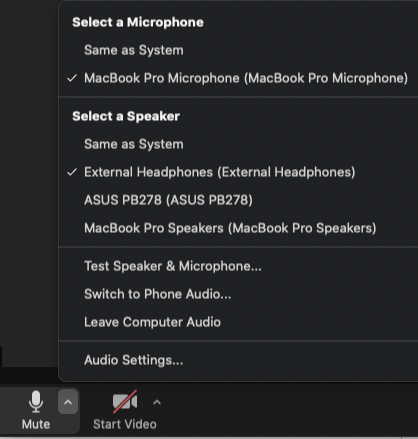
Need to change speaker/headphones or mic?
-
Select the up arrow next to the mic symbol. There you can select your microphone and speaker/headphone device.
-
Test your audio by selecting Test Speaker & Microphone.
Similar to your microphone, select Start Video at the bottom toolbar to turn on your camera.
If using a webcam or if you want to apply a virtual background/filter, select the up arrow next to the camera symbol to see your video settings and select a camera.

Zoom has a robust toolkit for Hosts to utilize during their meetings. Hosts can poll users, screenshare, enable chat, split meetings into breakout rooms, and much more. To learn more, check out Zoom’s guide to Host Controls.
The main Host controls are located in the Security, Participants and Chat windows opened from the icons in the Zoom toolbar.

Security:
-
controls what participants are able to do (share screen, use chat, rename themeselves, unmute themselves, start video)
-
Co-Hosts are able to do all functions even if it's disabled in Security
Partcipants window, select More at the bottom right:
-
check Play Join and Leave Sound to hear a chime as people join or leave the meeting
-
check Mute All Upon Entry so everyone joins muted (can also be enabled when meeting is scheduled)
In the Zoom toolbar select Participants to see the participants window. The Host and Co-Hosts can manage participants from this window by muting, turning off camera, renaming participants, assigning Co-Hosts, Mute All, etc.

The Host and Co-Hosts are not able to unmute a mic or turn on another participant’s camera. If a participant’s mic or camera is off, the Host and Co-Host can hover over the participant's name and select Ask to Unmute or More>Ask to Start Video.

Participants can type and send messages to other users within a meeting.
The Host or Co-Hosts can disable chat entirely from Security in the toolbar. Or specify who sees the chat messages by:
-
Select Chat to open the chat window.
-
Select the 3 dots at the bottom right of the chat window.
-
Choose if participants can chat with: No one, Host and Co-Hosts only, Everyone publicly, or allow Everyone and anyone directly.

Note: The Host and Co-Hosts can always send private messages and use chat even when it’s disabled for participants.
For more details, see https://support.zoom.us/hc/en-us/articles/203650445-In-Meeting-Chat
-
Open the application you want your participants to see (e.g., Google Chrome, Microsoft PowerPoint, etc.)
-
From the Zoom meeting, click the Share Screen button from the bottom toolbar.
-
Select the screen or software you want to share.
-
Click the Share button in the lower right.
-
Click the red Stop Share button at the top of your screen when you’re ready to end sharing.
Note: If sharing material with audio, select Share Sound at step 3.
For more details, see https://support.zoom.us/hc/en-us/articles/201362153-How-Do-I-Share-My-Screen-
If you need to share a video and you have an mov or mp4 file, see Zoom’s advanced video sharing feature.
Annotating a Shared Screen
Meeting participants can annotate a shared screen. For more details, see https://support.zoom.us/hc/en-us/articles/115005706806-Using-annotation-tools-on-a-shared-screen-or-whiteboard
While someone is screen sharing, the host can also prevent participants from annotating by selecting Security and uncheck Annotate On Shared Content.
Reactions allows participants to interact nonverbally. The main nonverbal icons are clapping hands, thumbs up, and raise hand. When selecting an icon, it will appear in the participant’s video panel and in the participants window.
The raise hand function is particularly useful during questions. Participants who raise their hand will rise to the top of the participants window in the order they pressed the button. Either the participant or Host/Co-Host will need to select Lower Hand for the icon to go away.
The Host or Co-Host can start a recording by clicking the Record button in the Zoom toolbar.
Choose to record to the computer or to the cloud. We recommend recording to the cloud because it provides a sharable link, automatic transcription, and still gives the option to download the video file.
Cloud Recording Ownership
Cloud recordings are saved to the owner of the meeting. This is not necessarily the Host.
- If the scheduler was not present and assigned an Alternative Host, the cloud recording still saves to the scheduler's Zoom account.
- If the meeting was scheduled on behalf of another, the meeting belongs to the 2nd party, not the scheduler.
Stop Recording
Recording stops by either selecting Stop Recording or ending the meeting. If you stop the recording during the meeting and start the record again, Zoom will generate two video files. If you Pause the recording, the start the record again only one video is generated.
Once the recording has been stopped, it must be processed before viewing. Zoom will send an email to your email address when the process is completed with two links - one for the host, the other for viewers.
Automatically Transcribe a Zoom Cloud Recording
Another advantage using cloud recording is that a transcript is automatically generated for the recording. The quality is not good enough to meet accessibility requirements, but it’s a good starting point. The transcript can be edited within the Zoom web portal or the caption file can be downloaded, edited and reuploaded with the video to another site.
https://support.zoom.us/hc/en-us/articles/115004794983-Automatically-Transcribe-Cloud-Recordings-
See Remote Teaching Options for Classroom Activities for additional information specific to classroom recordings.
Zoom has a polling feature where you can create single choice or multiple choice polls for your meetings. You can gather responses with participant info or anonymously.
Breakout rooms are used to break up the meeting into smaller groups. Useful for group discussions. The Host and Co-Hosts can navigate between rooms but can’t speak or be seen by all groups at the same time.
Click the red End button at the bottom right of the Zoom window.
If International participants would like to join the zoom meeting by phone (because an internet connection is not available to join by computer), they can do so using a local phone number.
https://support.zoom.us/hc/en-us
Zoom offers live training Monday through Friday. The 30 minute Getting Started sessions include real-time Q&A. You can also watch recorded training sessions.
Zoom Frequently Asked Questions - https://support.zoom.us/hc/en-us/articles/206175806-Top-Questions