
This documentation explains how to set up file sharing on a Macintosh computer with OS X v.10.5 or 10.6, how to remove file sharing, and how to connect to files on a shared Mac. Any Macintosh computer properly connected to the Wellesley College network should be able to share files with any other Macintosh or Windows computer on campus that is also connected to the Wellesley College network.
|
New to File Sharing? |
Set up File Sharing |
Connect to a Shared Mac |
Remove File Sharing |
Before you begin
- Your computer must be connected to the Wellesley College campus network in order to set up file sharing.
- Make sure your virus protection is up-to-date. For more information, see the postings in the AntiVirus Updates subconference in Computing Questions on FirstClass.
- You will need the username and password for an Administrator account on your Mac. To check if you are an Administrator, go to the Apple Menu > System Preferences > Users & Groups. You must know the password to one of the Administrator accounts on the device.
Setting up file sharing with other Macs
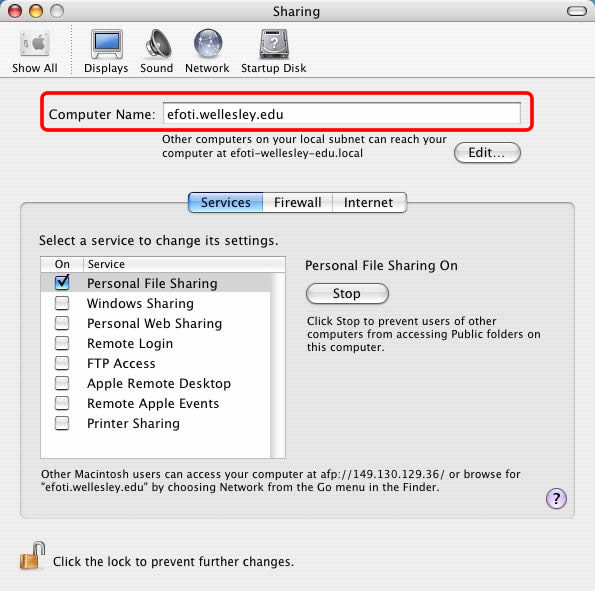
- Go to the Apple Menu > System Preferences > Sharing.
- Under the Services tab, check File Sharing .
- If you would like to share your public folders, you can click Start to turn this on or Stop to turn it off. Note: Although file sharing is turned on, not every file on your hard disk will be shared. Users will be given the choice to view your home directory or your entire hard drive. However, users still cannot see your private files.

- Click the Firewall tab and check Personal File Sharing .
- Click Start to enable file sharing with other Macs.

Setting up file sharing with Windows computers
- Go to the Apple Menu > System Preferences > Sharing.
- Under the Services tab, check Windows Sharing.
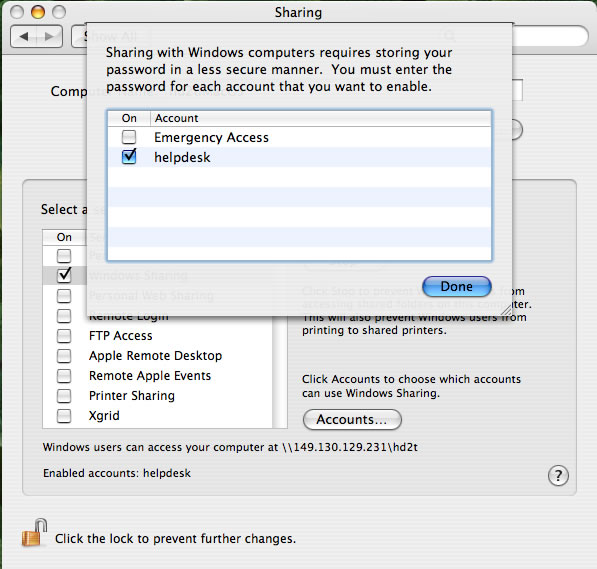
- Click on Windows Sharing to make sure it's highlighted as shown below. Click Start so that Windows Sharing On is displayed on the right. Finally, if you are running OS X v.10.4, click Accounts . OS X v.10.3 users will not have this option and can proceed to step 5.

- In OS X v.10.4, users must connect to your computer with an account already on the machine. It is recommended that you create a guest account and give this account name to those you wish to share with. Click Accounts and then check the box beside the account(s) that will share files with you. When you check the box beside an account, you will be prompted to enter the password and click OK . Click Done when you are finished.
- Click the Firewall tab and check Windows Sharing .
- Click Start to enable file sharing with Windows computers.
Connecting to a shared Mac or PC from a Mac
To view files on a shared Mac while using a Mac
- Go to Macintosh HD > Network > Local. The name of the computer you are looking for should be listed if both computers are part of the same sub-network.
OR
- You can also access the shared computer by going to Go > Connect to Server .
- Type in the IP address of the computer you are trying to connect to in the format: smb://hostname.wellesley.edu.
Connecting to a shared Mac from Windows
- Click Start > Run .
- Type: \\hostname.wellesley.edu
- Select OK .
- Enter the username and password of the Macintosh account as described above in step #4.
How to remove file sharing
To turn off file sharing completely:
- Go to the Apple Menu > System Preferences > Sharing .
- Uncheck all options under the Services tab. This will stop your computer from sharing any file.