
The directions below allow a computer running Windows Vista 32-bit or 64-bit to print to the networked laser printers in the Computing Labs across campus.
NOTE: Before following the instructions to add a new networked printer, find out the queue name, manufacturer and model number of your printer and make sure the printer is powered on .
The queue name will be a set of six numbers and letters. The printer should be labeled with its correct queue name.
Adding a new printer
1. Go to Start > Control Panel, and in the Hardware and Sound section, click Printers.
2. In the toolbar, click Add a Printer.
3. In the Add Printer window, click Add a network, wireless, or Bluetooth printer .
4. In the next window, click The printer that I want isn't listed.
5. In the next window, select Add a printer using a TCP/IP address or hostname and click Next.
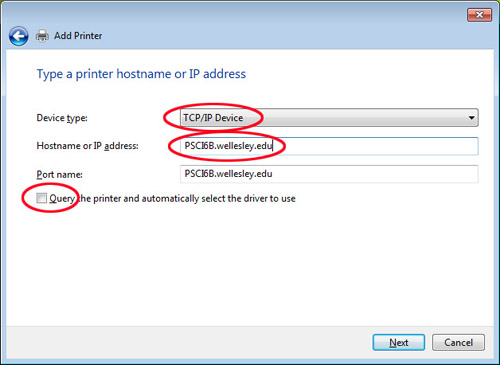
6. In the next window, in the Device type drop-down box, select TCP/IP Device. In the Hostname or IP address field, type in the queue name for the printer you want and add .wellesley.edu (For example, PSCI6B.wellesley.edu for a Science Center printer). The same information will automatically be typed into the Port name field. Uncheck Query the printer and automatically select the driver to use. Click Next .
7. In the Install the printer driver window, select HP from the Manufacturer list and select the model of the printer from the Printers list. When selecting the model, choose the printer that ends in PS, not PCL. PS, or PostScript, is a more robust printing protocol that handles printing PDF files better with the HP LaserJet printers on campus, and the PS driver is easier to configure duplex printing. If the printer model is not listed or only has a PCL driver listed, please follow the directions below to install the HP Universal Printing Utility for your version of Windows Vista.
1. To check if you have 32-bit or 64-bit Vista, go to Start > Control Panel > System & Maintenance > System. In the System window, under the System section, at the System Type field, it will say 32-bit or 64-bit Operating System.
2. For Windows Vista 32-bit, for all HP LaserJet printers, download this driver package, upd-503-ps32 .
3. For Windows Vista 64-bit, for all HP LaserJet printers, download this driver package, upd-503-ps64 .
4. Double-click on the downloaded driver package (upd-503-ps32.exe or upd-503-ps64.exe) and click Run when prompted by Windows. Then click Unzip in the WinZip window. After the files are extracted, click OK and then Close . You may now delete the upd-503-ps32 and upd-503-ps64 files.
5. In the Add Printer window, click Have Disk .
6. In the Install from Disk window, click Browse and select either the C:\HP Universal Print Driver v5.0.3 for Windows - PostScript\ or C:\HP Universal Print Driver v5.0.3 for Windows x64 - PostScript\ folder and click Open . You should not have to select a specific file, but if you are prompted to, select any file listed. In the Install from Disk window, click OK.
7. Select HP Universal Printing PS and click Next.

8. If a Which version of the driver do you want to use window appears, select Replace the current driver and click Next .
9. In the Type a printer name window, type in a name for the printer. It usually helps to include the queue name and model number so you can identify the printer in your printer list. Decide if you want to have this printer be your default printer or not, then click Next.
10. Windows will now finish setting up the printer on your computer. This will take about a minute.
11. When the setup is complete you will have the option of printing a test page. It is a good idea to print a test page so that you can verify the printer works correctly, but it is not necessary. Click Finish to exit the setup wizard.
12. The printer should now be listed in the Printers window, and will be available in all applications.
13. If the printer has a duplexer / double-sided option and you would like to use this feature, please see the next section.
Configuring double-sided / duplex printing
1. Go to Start > Control Panel, and in the Hardware and Sound section, click Printers .
2. Right-click on the printer you want to set to duplex and select Printing Properties .
3. In the Properties window, go to the Advanced tab and click Printing Defaults .
4. In the Printing Defaults window, go to the Finishing tab. In the Document Options section, check the checkbox for Print on Both Sides and click OK .
5. In the Properties window, click OK .
-

6. You may now close the Printers window.
7. Double-sided printing will now be the default when you print to this printer. If you want to print single-sided, in the application you are using go to File > Print and click the Properties button next to the printer. Go to the Finishing tab and uncheck the box next to Print on Both Sides .